How did you find this article?
Did you type a couple of keywords into Google using fingers on a keyboard?
Or maybe you used thumbs on a phone screen?
The vast majority of the time, we do these actions without even thinking. We’re so used to entering information to keyboards and phones that we don’t consider our typing ergonomics at all.
But when the discomfort and pain starts to creep in, you start to think a bit more about the way you type.
So here’s your full guide on the ergonomics of typing from the expert ergonomists at Ergo Global!
Why Typing Ergonomics Is Important

Typing ergonomics isn’t just about comfort; it’s about protecting your body from the wear and tear of repetitive motion.
Repetitive motion really is one of the biggest risks when it comes to anything you do at work.
Doing the same thing over and over again, as we tend to do all day on our keyboards and phone screens, can lead to repetitive strain injuries (RSI) like carpal tunnel syndrome and generally stiff wrists and fingers that can lead to pain.
Over time, ignoring ergonomics risks in typing can lead to long-term health issues.
While, on the other hand, the correct typing equipment and the correct way of using it can boost…
- Health – 60% of office workers experience hand or wrist pain from prolonged typing (National Institute for Occupational Safety and Health (NIOSH), 2021)
- Productivity – Ergonomic setups can improve typing speed by up to 10% (Cornell University Ergonomics Research, 2019)
5 Steps to Improve Your Typing Ergonomics
Step #1 – Adjust Your Body Position
Despite what you might be thinking, proper ergonomics for typing doesn’t begin with your keyboard…
…it begins with your chair.
Your chair is the base of everything you do while you work. Having the right kind of chair, and using it properly, is the foundation of being able to type without pain.
For better typing ergonomics, pay attention to how you do these:
- Sit with your lower back in contact with your chair’s lumbar support
- Relax your shoulders
- Have your feet flat on the floor
- Adjust your seat height so your thighs are parallel to the ground with a slight downward slope
It might be a little confusing as to how this will help your typing position, but trust us, all of the advice above gives your body a solid ergonomic foundation, which in turn will reduce any pain when typing.

Step #2 – Focus on your Elbows
With your new ergonomic foundation, you should ensure one more thing with your posture…
…that your elbows are at a 90° angle when typing.
This doesn’t have to be exactly 90°, but if you’re close to that right-angle, with your forearms parallel or nearly parallel to the floor, then you’re all set.
9 times out of 10 you can achieve this 90° angle in the elbows by adjusting the height of your chair.
But if your body doesn’t quite align after adjusting your chair, then it’s possible you need to adjust your desk height.
A standing desk is obviously perfect for this, but if you don’t have one, you can put reams of paper under the legs to raise it up.
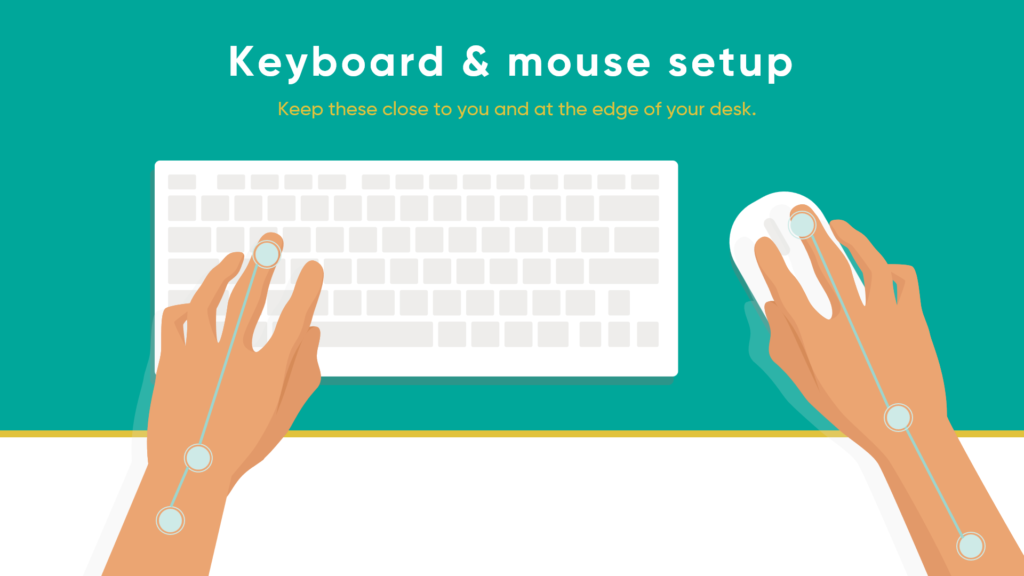
Step #3 – Position your Keyboard
Your keyboard’s placement sets the stage for arm and shoulder comfort.
Without realising it, many office and remote workers place their keyboard too far from their body, meaning that their arms have to stick out straight, leaving the elbows at an uncomfortable 180° angle.
This not only puts strain on the elbows, but the arms and shoulders too.
If you’re using a standalone keyboard and monitor, the fix is simple – slide your keyboard as close as possible to the edge of your desk.
However, if you’re using a laptop with an inbuilt keyboard, we’d highly recommend buying a separate, standalone keyboard.
Laptop keyboards are optimised just for convenience, rather than ergonomics, and prolonged use of one can mean that you’re missing out on the ergonomic benefits of a moveable, standalone keyboard.
Step #4 – Rest your Wrists
Just like your whole body, your wrists need regular break from the work you’re heaping on them during work.
Your wrists are the hinges that help your hands travel across the width of the keyboard, enabling you to reach all the keys.
Because of this, they do a lot of the same movement – left, right, left, right…
And a lot of repetitive movement like this can lead to RSI.
So try this…
- During typing – Let your hands hover lightly over the keys.
- During pauses – Use a wrist rest: a soft bar that’s placed in front of your keyboard.
This will allow your wrists to enjoy a break – it’s the least they deserve!
Step #5 – Take a Break
Well, you’ve made it this far, so I think you also deserve a break!
The truth is that even the best ergonomic typing setup can’t fully offset the risks of nonstop typing – humans simply were not made to sit and mash buttons repeatedly for hours on end.
So, every hour, try to step away from your workstation for at least 5 minutes to reset your body.
For maximum effect, you could try walking around the office, going to grab something to eat, going to chat with colleagues – anything that gets you out of your seat and moving around!
To us, the absolute best thing you can do on your breaks is to perform some wrist and arm stretches.

The Best Ergonomic Equipment for Typing
The right workstation tools can elevate your game and your wrist health.
Try these:
- Ergonomic keyboard: Though these are far from essential for everyday typing, you can get ergonomic keyboards with split designs (like the Kinesis Freestyle or Moonlander) that can reduce wrist twist.
- Adjustable chair: This is an essential for any ergonomic workstation. If you can adjust the backrest, lumbar support, seat pan and height, then you’ll be able to adapt your workstation around your body – including wrists!
- Wrist Rests: As mentioned above – try to aim for a soft wrist rest with either gel or memory foam filling (like the HyperX Wrist Rest) to provide your wrists a cushion and break from the constant pressure of typing.
- Vertical mouse: A vertical, ergonomic mouse (like the Logitech MX Vertical) allows you to mouse with your wrist in its most natural position. This eases the strain and makes it less painful to type.
When it comes to typing in an ergonomic way, you don’t need to completely overhaul your current setup.
Just a bit of awareness and a few smart adjustments is all you need to take the pressure off of your wrists and allow them to facilitate your work in a healthy way.
Contact Ergo Global to learn more about training and support for your workplace!