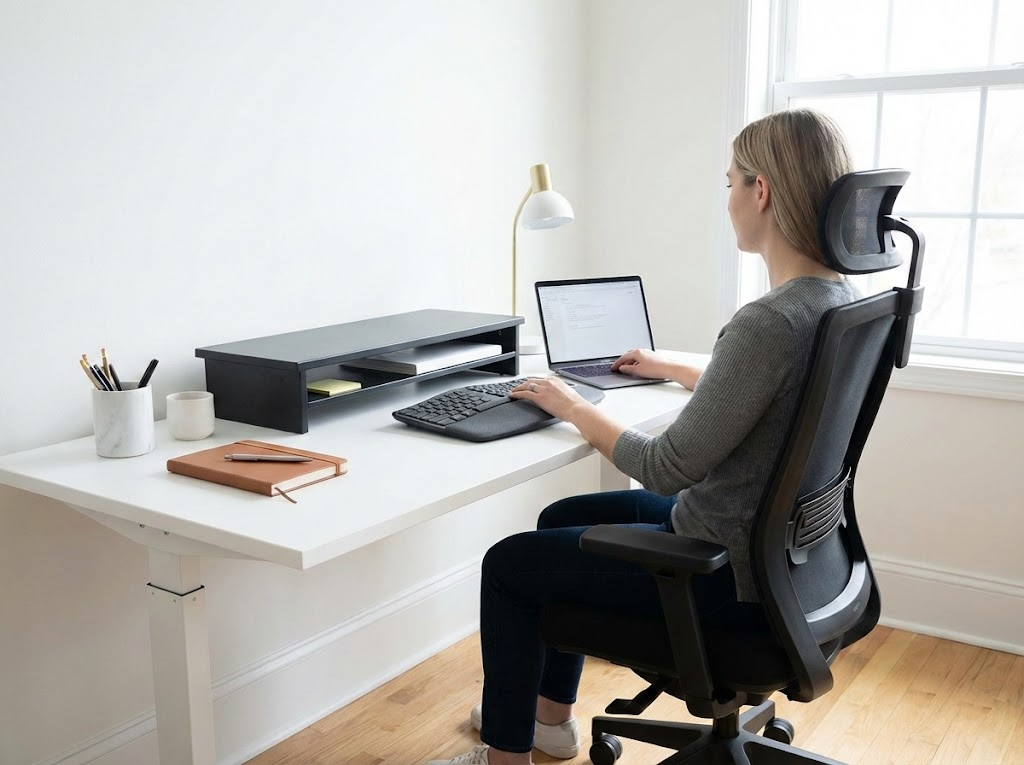
Working long hours at a desk can take a toll on your body if your workstation isn’t set up properly. An ergonomic workstation setup is all about arranging your workspace to keep you comfortable and free of strain throughout the day. This means adjusting things like your chair height, monitor level, and keyboard position so you can maintain good posture and avoid common issues like back or neck pain.
By following an ergonomic workstation checklist, you’ll reduce the risk of aches, fatigue, and long-term injuries while boosting your productivity in the process.
Below, we’ve put together an easy-to-follow checklist to help you set up your workstation ergonomically. This checklist covers all the main areas – from your chair and desk to your monitor, keyboard, and other work habits – to ensure your workspace supports your health.
Chair Setup

Your chair is the foundation of an ergonomic workstation. A good office chair supports your posture and allows you to sit with your feet flat and your back comfortably aligned. Adjust your chair so that it fits you before moving on to other parts of your workstation. Here’s what to check for your chair setup:
| Chair Adjustment | What to Check |
| Adjustable Height | Feet flat on floor (or on a footrest) with knees about 90° bent, level with hips. This proper height ensures healthy leg circulation and posture (as recommended by WorkSafe Queensland and OSHA). |
| Lumbar Support | Supports lower back’s curve. Adjust the backrest to fit the natural curve of your lower back, so you don’t slouch. This helps maintain a neutral spine posture and prevents back pain. |
| Seat Depth | 2–3 finger gap behind knees. There should be a small gap (about 2–3 fingers’ width) between the back of your knees and the seat edge. This avoids pressure on the backs of your legs and allows good blood flow. |
| Armrests | Elbows at ~90°, shoulders relaxed. Set armrest height so your elbows rest comfortably at a right angle and your shoulders aren’t hunched up. You should be able to keep your upper arms close to your body. |
| Stable Base | Five-point base for stability. Use a chair that has a five-point wheel base (five caster wheels). This design makes the chair stable and easy to roll, preventing tip-overs and allowing you to move smoothly. |
Tip: If your feet don’t reach the floor comfortably after adjusting your chair height, use a footrest. A footrest lets you support your feet at the proper height so your knees stay at about a 90° angle. This is better than lowering your chair so much that your desk is too high. Make sure any footrest is large enough for both feet and is stable (doesn’t slide).
Desk Setup

Your desk works hand-in-hand with your chair. The right desk height and layout will let you sit (or stand, if using a standing desk) with relaxed shoulders and arms. You shouldn’t have to strain or contort to use your keyboard or see your screen. Check these desk setup points:
| Desk Adjustment | What to Check |
| Height | Elbows at 90° when typing. Adjust your desk height so that when you sit (or stand) at it, your forearms are horizontal and your elbows bend roughly 90° (or slightly more open). In other words, your keyboard and mouse should be at about elbow height. This way, your shoulders can relax and you won’t have to reach up or down. (According to ergonomic guidelines, your elbows should be level with the desk surface for a neutral arm position.) |
| Leg Clearance | Free space under desk. Ensure there’s enough empty space under your desk for your legs and knees. You should be able to comfortably slide your chair in and move your legs around. Remove any trash bins, boxes, or clutter that might impede your feet and legs. Proper clearance helps you change posture and stretch your legs during the day. |
| Surface Area | Clutter-free work area. Keep your desktop organized with plenty of space for your equipment. All the items you use frequently (like your keyboard, mouse, notepad, or phone) should be within easy reach. A spacious, tidy surface prevents you from having to twist or reach too far, which can strain your back or shoulders. |
| Sit-Stand Desk (Optional) | Alternate positions if using a standing desk. If you have an adjustable or sit-stand desk, take advantage of it! Switch between sitting and standing periodically (for example, stand for 10–15 minutes every hour) to promote circulation. When standing, adjust the desk so your elbows still rest at ~90° and the monitor is at eye level. Changing positions helps reduce fatigue — just remember to maintain the same ergonomic principles whether sitting or standing. |
Tip: Once your chair and desk are set to the right height, lock your chair’s wheels or use a chair without wheels on hard floors, if possible, to prevent gradually sliding away from the desk as you work. Also, if you use desk accessories like a keyboard tray or monitor stand, ensure they are securely installed and adjusted to the proper height.
Monitor Position

Staring at a screen that’s too high, too low, or too close can cause neck strain, eye strain, and headaches. Setting up your monitor correctly will help you keep your head and neck in a comfortable position and reduce eye fatigue. Use this checklist for your computer monitor (or laptop screen) placement:
| Monitor Setup | What to Check |
| Screen Height | Top of screen at eye level. Adjust your monitor so that the top of the screen is at your eye level, or slightly below eye level. This typically means your eyes naturally hit about 1/3 down from the top of the screen when you look straight ahead. You shouldn’t have to crane your neck up or down to see. Keeping the monitor at eye height helps you maintain a neutral neck position (no “turtle” neck or hunching). |
| Viewing Distance | About an arm’s length away. Position the monitor roughly an arm’s length from your face (usually about 50–70 cm, or 20–28 inches). At this distance, you should be able to read the screen without leaning forward or squinting. If you have a larger monitor (or use multiple screens), you might need to sit a bit further back so you can see everything clearly. Adjust font sizes and display settings if you find yourself leaning in to read text. |
| Screen Glare | No glare or harsh reflections. Check that light isn’t bouncing off your screen. Glare can cause you to squint or adopt awkward postures to see. To reduce glare, you can tilt the monitor slightly, close blinds or curtains on nearby windows, or adjust overhead lighting. If needed, consider an anti-glare screen filter. Your goal is a comfortably visible screen without needing to lean or strain. |
| Dual Monitors (if applicable) | Equal height & centered. If you use two monitors, set them up side by side at the same height and distance. For dual monitors that you use equally, place them directly in front of you, with the seam between them centered. If one monitor is your primary screen and the other is secondary, put the primary monitor straight in front of you and the second one off to the side. Both screens should still be about arm’s length away and at eye level. This prevents a lot of neck twisting and ensures both monitors are used in a comfortable posture. |
Tips:
- Laptop users: Working long hours on a laptop’s built-in screen can be tough on your neck and eyes. If you use a laptop as your main computer, consider using a laptop stand or propping it up so the screen is at eye level, and plug in a separate keyboard and mouse. This essentially turns your laptop into a proper monitor + keyboard setup and will be much more ergonomic than hunching over a low laptop screen.
- Adjust for glasses: If you wear bifocals or progressive lenses, you may need to position the monitor slightly lower than eye level so you can view through the appropriate part of your lenses without tilting your head back. Everyone’s comfort is a bit different, so adjust your screen height to what feels best for your eyes and neck.
Keyboard and Mouse Placement

Your keyboard and mouse are where your hands spend most of the day, so their position is critical for arm and wrist comfort. An ergonomic setup will keep your wrists straight and your arms relaxed as you type and click, helping prevent strain or conditions like carpal tunnel syndrome. Use this checklist to optimize your keyboard and mouse setup:
| Keyboard/Mouse Setup | What to Check |
| Placement | Keep them close and centered. Position your keyboard directly in front of you, aligned with your body’s center (usually the “B” key or spacebar in line with your belly button). Place the mouse immediately next to the keyboard, on the same level. You shouldn’t have to reach forward or far to the side for either device. Keeping them close allows your elbows to stay by your sides and prevents overreaching. |
| Neutral Wrist Position | Wrists straight, not bent. When typing or using the mouse, your wrists should be in a straight line with your forearms (not angled up, down, or sideways). Adjust your keyboard tilt or chair height if you notice your wrists bending. Often, keeping the keyboard flat (or only slightly propped up) helps maintain neutral wrists. When you type, try to float your wrists and hands rather than resting them on the desk – this encourages a lighter, more neutral position and avoids pressure on the wrist. |
| Wrist Rests (optional) | Use support during pauses. A soft wrist rest (for keyboard and mouse) can provide support for your palms when you are not actively typing or clicking. It’s important not to plant your wrists on a hard surface for long periods. However, remember that wrist rests are for resting between typing, not for pressing on while typing (which could actually increase strain). Use them to cushion your wrists during breaks or when you’re reading the screen, but keep wrists free while typing. |
| Mouse Grip & Movement | Light grip, arm movement. Hold your mouse gently, not in a death grip. Use your whole arm (shoulder and elbow) to move the mouse, rather than just cranking your wrist. Also, adjust mouse sensitivity settings if needed so that you can cover the full screen without excessive hand movement. A larger mouse pad can allow more arm movement. If you do a lot of mousing, consider an ergonomic mouse design that fits your hand and keeps your wrist in a more neutral handshake position. |
Tips:
- Keyboard shortcuts: Reduce repetitive mouse use by learning common keyboard shortcuts for your software. This can minimize how often you need to reach for the mouse and give your right hand/wrist a break.
- Alternate hands (if possible): Some people train themselves to use the mouse with their left hand periodically. If you’re comfortable doing that (and your software is set up for it), it can help distribute the workload between both arms. This isn’t for everyone, but it’s an option to consider in reducing repetitive strain on one side.
Additional Ergonomic Tips
Beyond the big items like chair, desk, and computer equipment, a truly ergonomic workstation also involves your environment and work habits. Don’t forget these additional checklist items to keep yourself comfortable and healthy on the job:
| Other Considerations | Checklist and Tips |
| Lighting | Proper lighting, no glare. Make sure your workspace has adequate lighting. You shouldn’t be straining to read documents or see the keyboard. Natural light is great, but avoid glare on your screen – use blinds or position the monitor perpendicular to windows if needed. Good task lighting (like a desk lamp) can help for reading papers, while reducing harsh overhead light can prevent monitor glare. The goal is a well-lit area without extreme brightness contrast. |
| Work Breaks | Take regular breaks to move. Even with a perfect ergonomic setup, your body needs to change positions and stretch. Aim to take a quick break every 30 to 60 minutes. This can be as simple as standing up to walk to the printer, doing a quick stretch at your desk, or rolling your shoulders and neck. Regular movement breaks help relieve muscle tension and improve circulation. Set a timer or use a break reminder app if you have trouble stepping away regularly. Your eyes will also thank you – try the “20-20-20” rule for eye strain: every 20 minutes, look at something 20 feet away for 20 seconds. |
| Workspace Organization | Keep tools within easy reach. Arrange your desk so that you rarely have to twist or reach awkwardly. Frequently used items (phone, notepad, pen, coffee cup) should be on the same side as your dominant hand and within arm’s reach. Use document holders for papers you refer to while typing, positioning them near your screen at eye level to avoid constantly looking down. A clutter-free, organized desk not only improves focus but also prevents awkward stretching or knocking things over. |
| Telephone Use | Use a headset or speaker. If your job involves a lot of phone calls, consider using a headset or speakerphone. Cradling the phone between your ear and shoulder is very hard on your neck and shoulders. A headset keeps your hands free and your head in a neutral position. Even for occasional calls, using the speaker or holding the phone with your hand (switching sides occasionally) is better than the shoulder-cradle. |
| Stress and Posture | Relax and adjust. Try not to tense up while working. Keep your shoulders relaxed and down, and your jaw unclenched. If you notice tension (e.g., raised shoulders or a forward head posture), pause and reset your posture. Sometimes just adjusting your chair or doing a quick stretch can refresh your posture. Being mindful of your body positions throughout the day will help you catch and correct bad habits. |
| Ergonomic Accessories | Consider special equipment if needed. Everyone’s needs are different. Don’t be afraid to try ergonomic accessories that can improve comfort. For example, an ergonomic keyboard (split or curved design) might help if you have wrist pain, or a standing mat can provide cushioning if you stand a lot. Monitor arms can allow more flexible screen positioning, and document holders keep reference papers upright. These tools can fine-tune your setup for maximum comfort. Just make sure any accessory is adjusted properly according to the checklist above. |
Remember: ergonomics is personal. The ideal setup can vary slightly from person to person, so use the checklist as a starting point and adjust to what feels best for your body. Listen to any pain or discomfort signals – they usually indicate something in your setup or habits that need changing. Don’t hesitate to tweak your chair, desk, or monitor positions over time.
Small adjustments can make a big difference in comfort.
Feel Great at Work with Ergo Global
An ergonomic setup is a great way to boost your health and productivity. If you need a hand creating a more comfortable workspace, Ergo Global is here to help.
We’re experts in making workstations comfortable and safe. Our certified team offers everything from personal assessments (online or in-person) to company-wide training programs. We’ve helped over half a million employees at more than 100 companies feel better and work smarter.
Whether you’re setting up a home office or improving your company’s workspace, we’ll create a personalized plan that works for you.
Talk to Ergo Global to learn how we can help you work pain-free.